A Practical Guide through the Libreboot jungle
A few days ago, I finished my ideal computer. Now, I’m writing this on a Librebooted ThinkPad W500 with a Quad-Core processor – the most powerful Libreboot machine available. This means that I have a computer that runs mostly without proprietary code, with a few unavoidable exceptions, and without Intel’s Management Engine or AMD’s Platform Security Processor. My criteria for the computer were as follows (in prioritized order):
- The computer should be as free as possible.
- The computer should be robustly built.
- The computer should have replaceable parts.
- The computer should be as powerful as possible while meeting criteria 1-3.
Librebooting your first machine can daunting, and Libreboot’s documentation is so comprehensive that it can seem overwhelming. Here, I provide a guide through the choices you will make when you want a Librebooted computer. This guide assumes knowledge of the Linux command line or similar to compile software, flash, etc. Always refer to the official documentation, but use this guide as a tool to navigate through the Libreboot jungle.
Part 1: Which computer should I choose?
Libreboot has recently changed its policy. Previously, Libreboot was a 100% libre version of Coreboot, but now it includes proprietary code for some machines if avoiding it is not possible. This means that Libreboot can support more hardware than before, but it also means that not all Libreboot machines have completely free boot firmware. However, there is a Libreboot fork called Canoeboot that does not include proprietary code (maintained by Leah Rowe, the same maintainer as Libreboot, as somewhat of a joke following some internet drama involving Libreboot and the FSF). If we refer to the list of supported machines on the Canoeboot website, we can see all the machines we can Libreboot without proprietary code.
To me, there are 3 different paths that are valid. I will outline them here:
1: I want the most powerful Libreboot computer available
You should choose one of the following models:
- ThinkPad T500/W500 – these two are functionally identical and support a Quad-Core CPU with some hardware modifications.
- ThinkPad T400 – essentially the same machine as the ones mentioned above, but with a smaller screen. It can also support a Quad-Core CPU.
- ThinkPad R500/R400 – essentially the same machine as T500/T400 but with lower build quality. It probably also supports a Quad-Core CPU (I’m not sure).
These machines require complete disassembly to Libreboot. For me, it’s not much of a problem as there are more difficult aspects to Librebooting a computer than taking it apart. T500/W500 comes with different battery sizes, various screen resolutions (up to 1920x1200), and versions with integrated graphics only or both integrated and dedicated graphics (meaning two graphics cards). When you Libreboot it, the dedicated graphics card is disabled as it requires proprietary code. If you want to install a Quad-Core processor, I recommend getting the version with dedicated graphics anyway, as it has better cooling (an extra heat pipe in the cooler). If you want to keep the dedicated graphics in the machine, I believe it’s possible with Coreboot, but it would require proprietary code, which I’m not interested in.
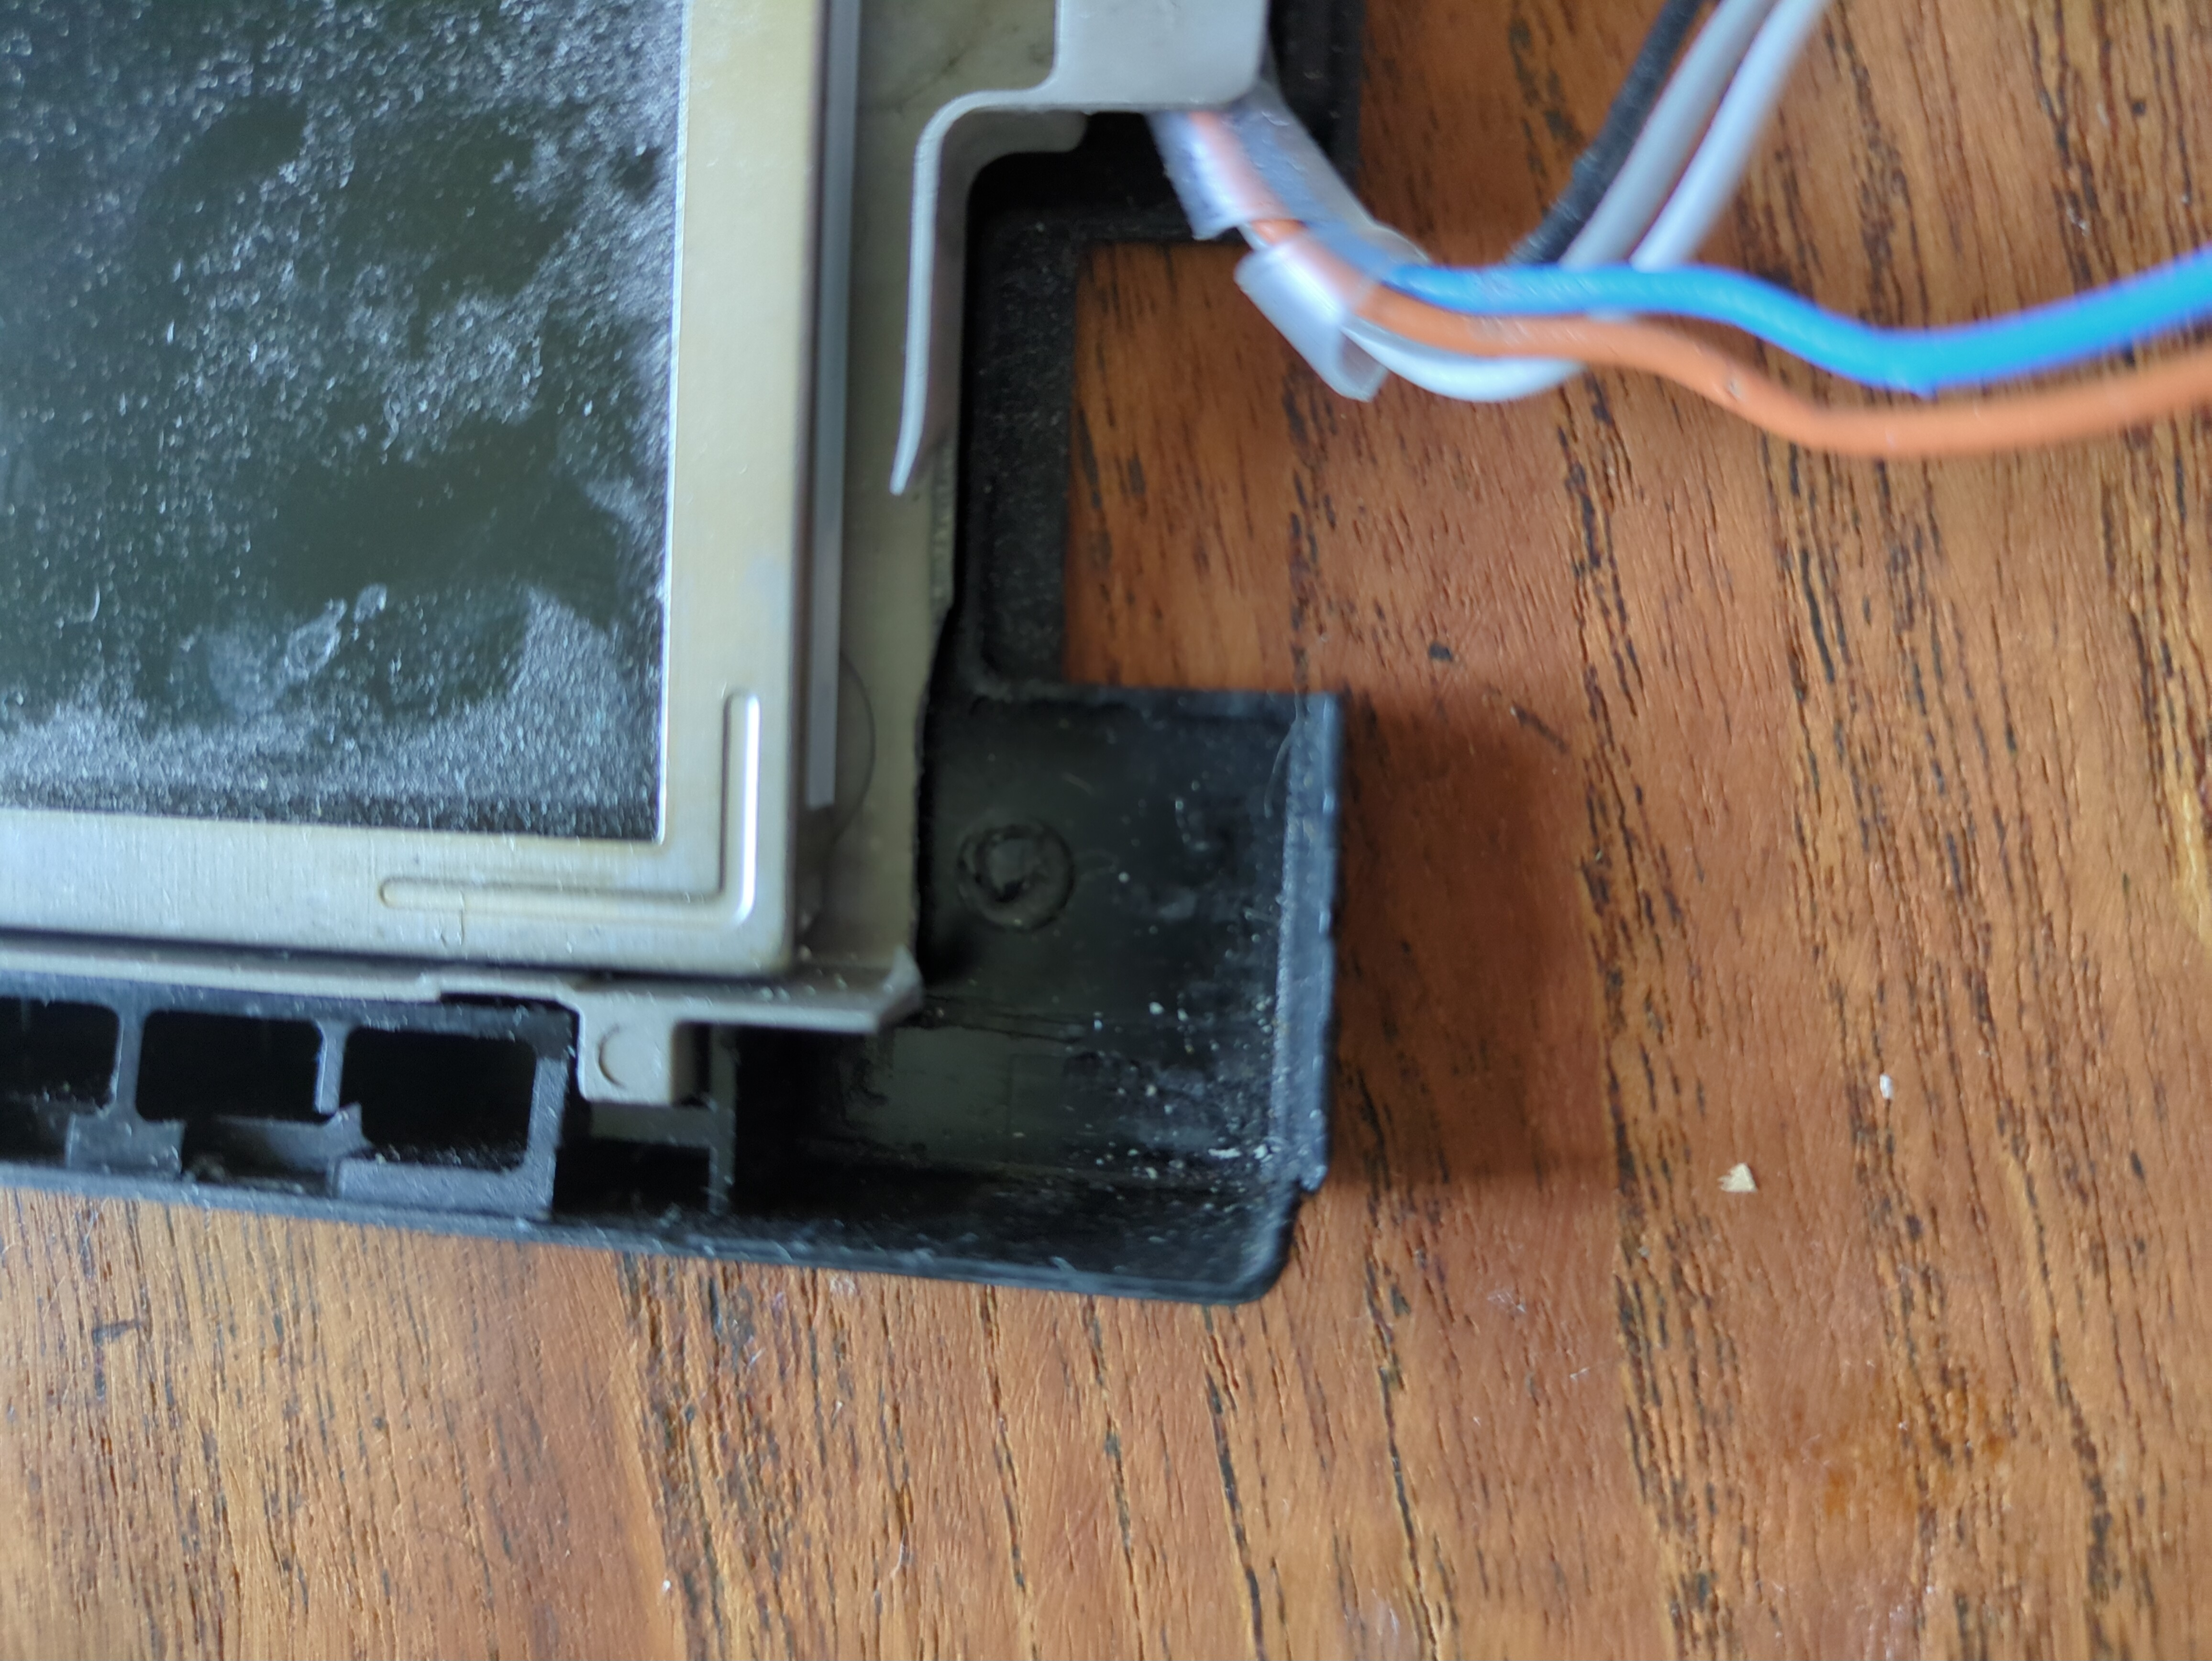
A couple of notes: I have owned the T500/W500 for a couple of years now and with the Quad-Core CPU and 8GB of RAM it handles the workloads I use it for just fine. The slowest part about it is the graphics card because the dedicated graphics is turned off, but it doesn't matter much unless you want to play newer games or render video. However, the build quality is disappointing. While it generally lives up to the fabled build quality of old Thinkpads, it has 1 major issue: hinge design. It has an asymmetrical hinge design where the left hinge is a little wider than the right one, and this seems to cause uneven pressure when the PC is opened and closed. There is also a bit of play in the hinges – if you move the screen, it can move a centimeter before it pushes on the hinge. This, combined with the hinges being way too tight and without adjustment possibilities (I tried to loosen the hinges with oil which helped a little but not enough), puts a lot of pressure on the lid and the magnesium rollcage that the hinges are screwed onto. These parts are already pretty exposed in the left part. For me, this means that the part that the hinges are screwed onto broke off on both my machines, prompting me to come up with redneck-fixes to fasten the hinge to the lid again.
Also worth considering:
- Dell Latitude E6400: This machine is as powerful as the ones mentioned above out of the box but doesn’t support a Quad-Core CPU. The ThinkPads mentioned above are more powerful if you install a Quad-Core CPU. It can be Librebooted through software, without the need for external flashing equipment.
Potentially, there is a way to make an E6400 support a Quad-Core CPU, but it’s not currently possible. See this Reddit thread.
All models in this section support up to 8GB of RAM. Make sure to purchase the correct type of RAM if you plan to upgrade to 8GB. For T500/W500 and similar models, you’ll need PC3-8500 RAM.
2: I want the most powerful Coreboot-computer without Intel ME / AMD PSP
If you are fine with proprietary GPU-code and just want to avoid Intel ME and AMD PSP, check out the Lenovo G505s. It is the latest AMD-machine that doesn't have AMD's Platform Security Processor and seems to be the most powerful machine without Intel ME or AMD PSP. However, it is not supported by Libreboot so you will have to Coreboot it instead (which I have not tried before and which is therefor outside of the scope of this post, but to do this you have to build a Coreboot-rom from source and flash to the bios-chip). A Corebooted Lenovo G505s will have following proprietary blobs:
- Cpu Microcode
- SMU Blob
- AtomBIOS Blobs
- EC Firmware
This is not much more that what is in a Librebooted Thinkpad and reverse-engineering-attempts of these proprietary parts have not revealed any backdoors or security issues. Therefore the G505s is a good, reasonably free machine.
3: I want a computer that is easy to Libreboot
- Dell Latitude E6400: This is by far the easiest machine to Libreboot, as it can be done through software.
- A Chromebook: Refer to the Canoeboot list for supported Chromebooks. Also see this note about some Chromebooks that are partially supported. I’m not sure if these partially supported models can run without proprietary code in Libreboot. Generally, I don’t know much about Chromebooks because they seem lame, but they can also be Librebooted through software.
- Apple MacBook 2,1: This can also be flashed internally. I don’t know much about this machine, but it doesn’t seem readily available in my country.
- ThinkPad X200: This is the easiest ThinkPad to Libreboot, requires external flashing equipment. You don’t need to completely disassemble it. Only the keyboard and palm rest need to be removed.
Note that X200 is also available as X200t and X200s (tablet and slim versions) – avoid those. These have a different type of chip that makes Librebooting them harder. Be aware that if you make a mistake when flashing Libreboot through software, you may need external flashing equipment to make the machine work again.
If I were in this category, I would go with the E6400 or X200.
Additional Information
Here is a short comparison of various Libreboot-ThinkPads, including an explanation of ThinkPad-names. I don’t know enough about desktop computers or servers that support Libreboot to comment on it.
Part 2: What other equipment do I need?
This section is based on a T500/W500. Adjust as necessary if you have a different machine.
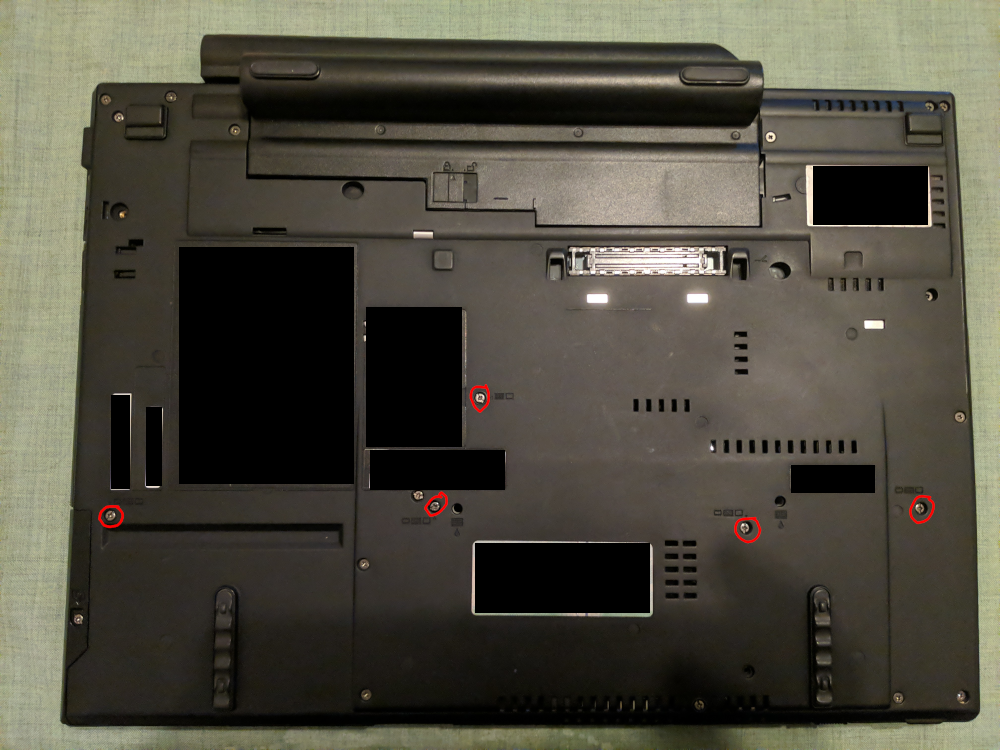
If you have chosen a computer that cannot be flashed through software, you will need external flashing equipment. First, you need to determine the type of BIOS chip you have. Remove the 5 screws on the back:
Now, the palm rest can be removed. Using a flashlight here, you can see part of the BIOS chip:
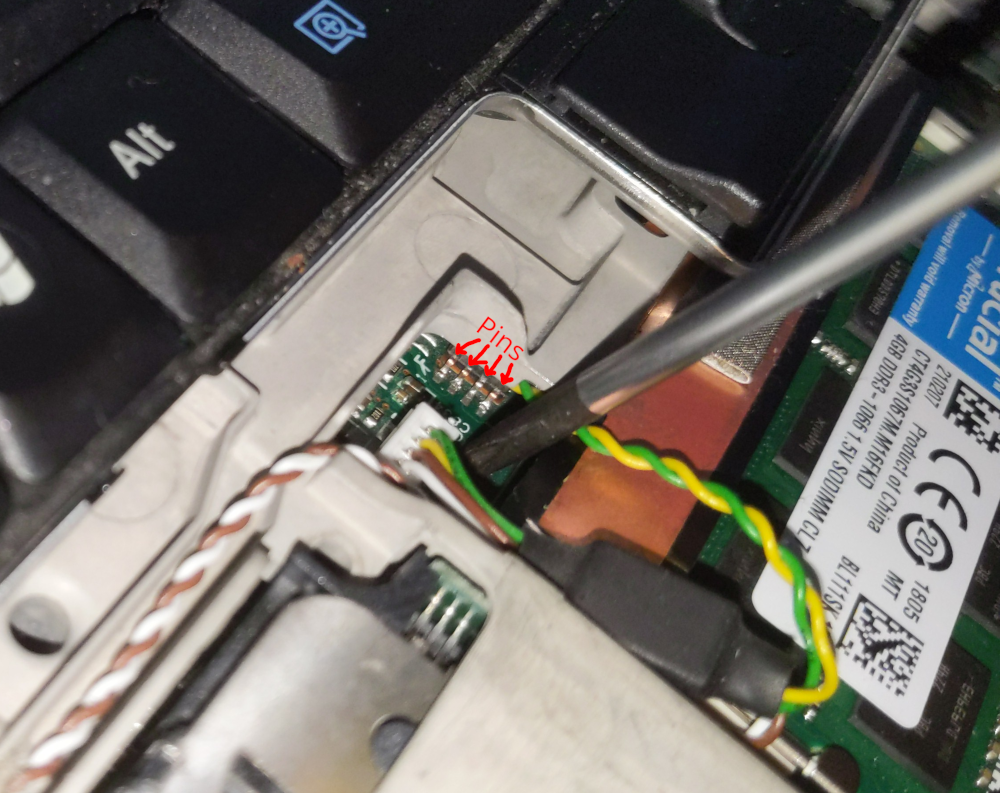
If the chip has 4 pins on each side (as shown in the picture), it’s an 8-pin chip, called SOP-8. If the chip has 8 pins on each side, it’s a 16-pin chip, called SOIC-16. If you have an s- or t-model (e.g., a ThinkPad X200s), you might have a completely different chip type. Double-check with this link to identify your flash type. If you can also read what’s written on the chip, that’s a good idea. If you can, look up the chip’s name and find its datasheet. Here, you can see whether the chip requires 3.3V or 1.8V. Here’s the datasheet for my chip:
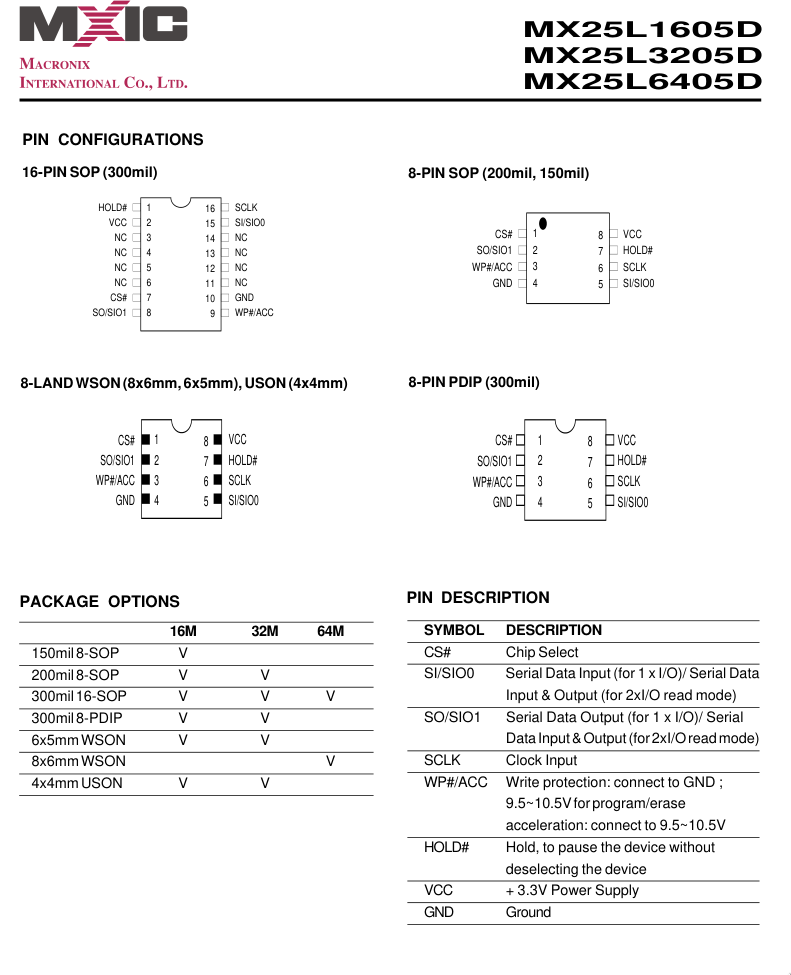
Here, you can see that my chip requires 3.3V.
If you can’t read what’s written on the chip, it’s not a big deal. Historically, all Libreboot-supported chips have required 3.3V, except for Chromebooks, which might need 1.8V (and only if they can’t start). However, in the future, Libreboot might add more 1.8V-chip-machines. Another thing worth trying is to install flashrom and run ‘flashrom -p internal’ on the machine you want to Libreboot. Flashrom should report one or more possible chip names. If there’s only one name, you’re lucky. If there are multiple names, and you want to be absolutely sure, you can look up all of them to ensure none of them require 1.8V. If 'flashrom -p internal' doesn't work, try booting with iomem=relaxed as a boot-parameter.
Now you can start finding the things you need.
External Flashing Equipment:
For flashing, you will need:
- An EEPROM programmer.
- A Pomona SOP-8 or SOIC-16 test clip (depending on your chip).
- Female-to-female jumper wires.
- Optionally, new thermal paste if you have a machine that needs to be completely disassembled. Arctic MX-4 is the standard.
You can use various programmers. If you already have a Raspberry Pi, you can use that. You can also use an Arduino, but you’ll need to configure it to provide 3.3V instead of 5V.
If you don’t have a programmer, I have two recommendations. Either a Raspberry Pi Pico (inexpensive, buy it with pre-soldered headers for little extra – you’ll need those) or a CH341A. The Raspberry Pi Pico is a good choice because it’s affordable, recommended by Libreboot itself, and readily available in (at least in my country). If you choose the Pico, it might be a good idea to purchase an official Micro-USB cable to ensure that the cable isn’t the cause of any problems you might run into.
CH341A is also inexpensive, but Libreboot maintainers claim it has a design flaw that causes it to run with 5V in the data lines instead of 3.3V. It appears, however, that the data lines run at the correct 3.3V as soon as it’s used. I don’t have enough electronics-knowledge to evaluate this, but regardless, I’ve used a CH341A for my chip, seemingly without problems. The main drawback of the CH341A is that it’s not as available as a Pi Pico (depending on where you live).
If you have a 1.8V chip, you will need a 1.8V converter that matches your programmer.
In addition to a programmer, you will need a clip that fits your chip (sometimes called a test clip). There are two types of test clips: Pomona clips and Chinese clips. I bought the cheap Chinese version after watching this video and had so many problems with it. They are very difficult to place correctly on the chip, rarely establish a working connection, and the plastic parts wear off if you try too many times – and then you won’t be able to place it on the chip at all. I recommend the Pomona clip. If you have the Chinese clip, the easiest redneck-method to achieving a good connection is to take out the spring, pull back the teeth, glue the clip in place on the motherboard with a hot glue gun and then pushing the teeth into the motherboard again untill they are touching the side of the pins on the chip:
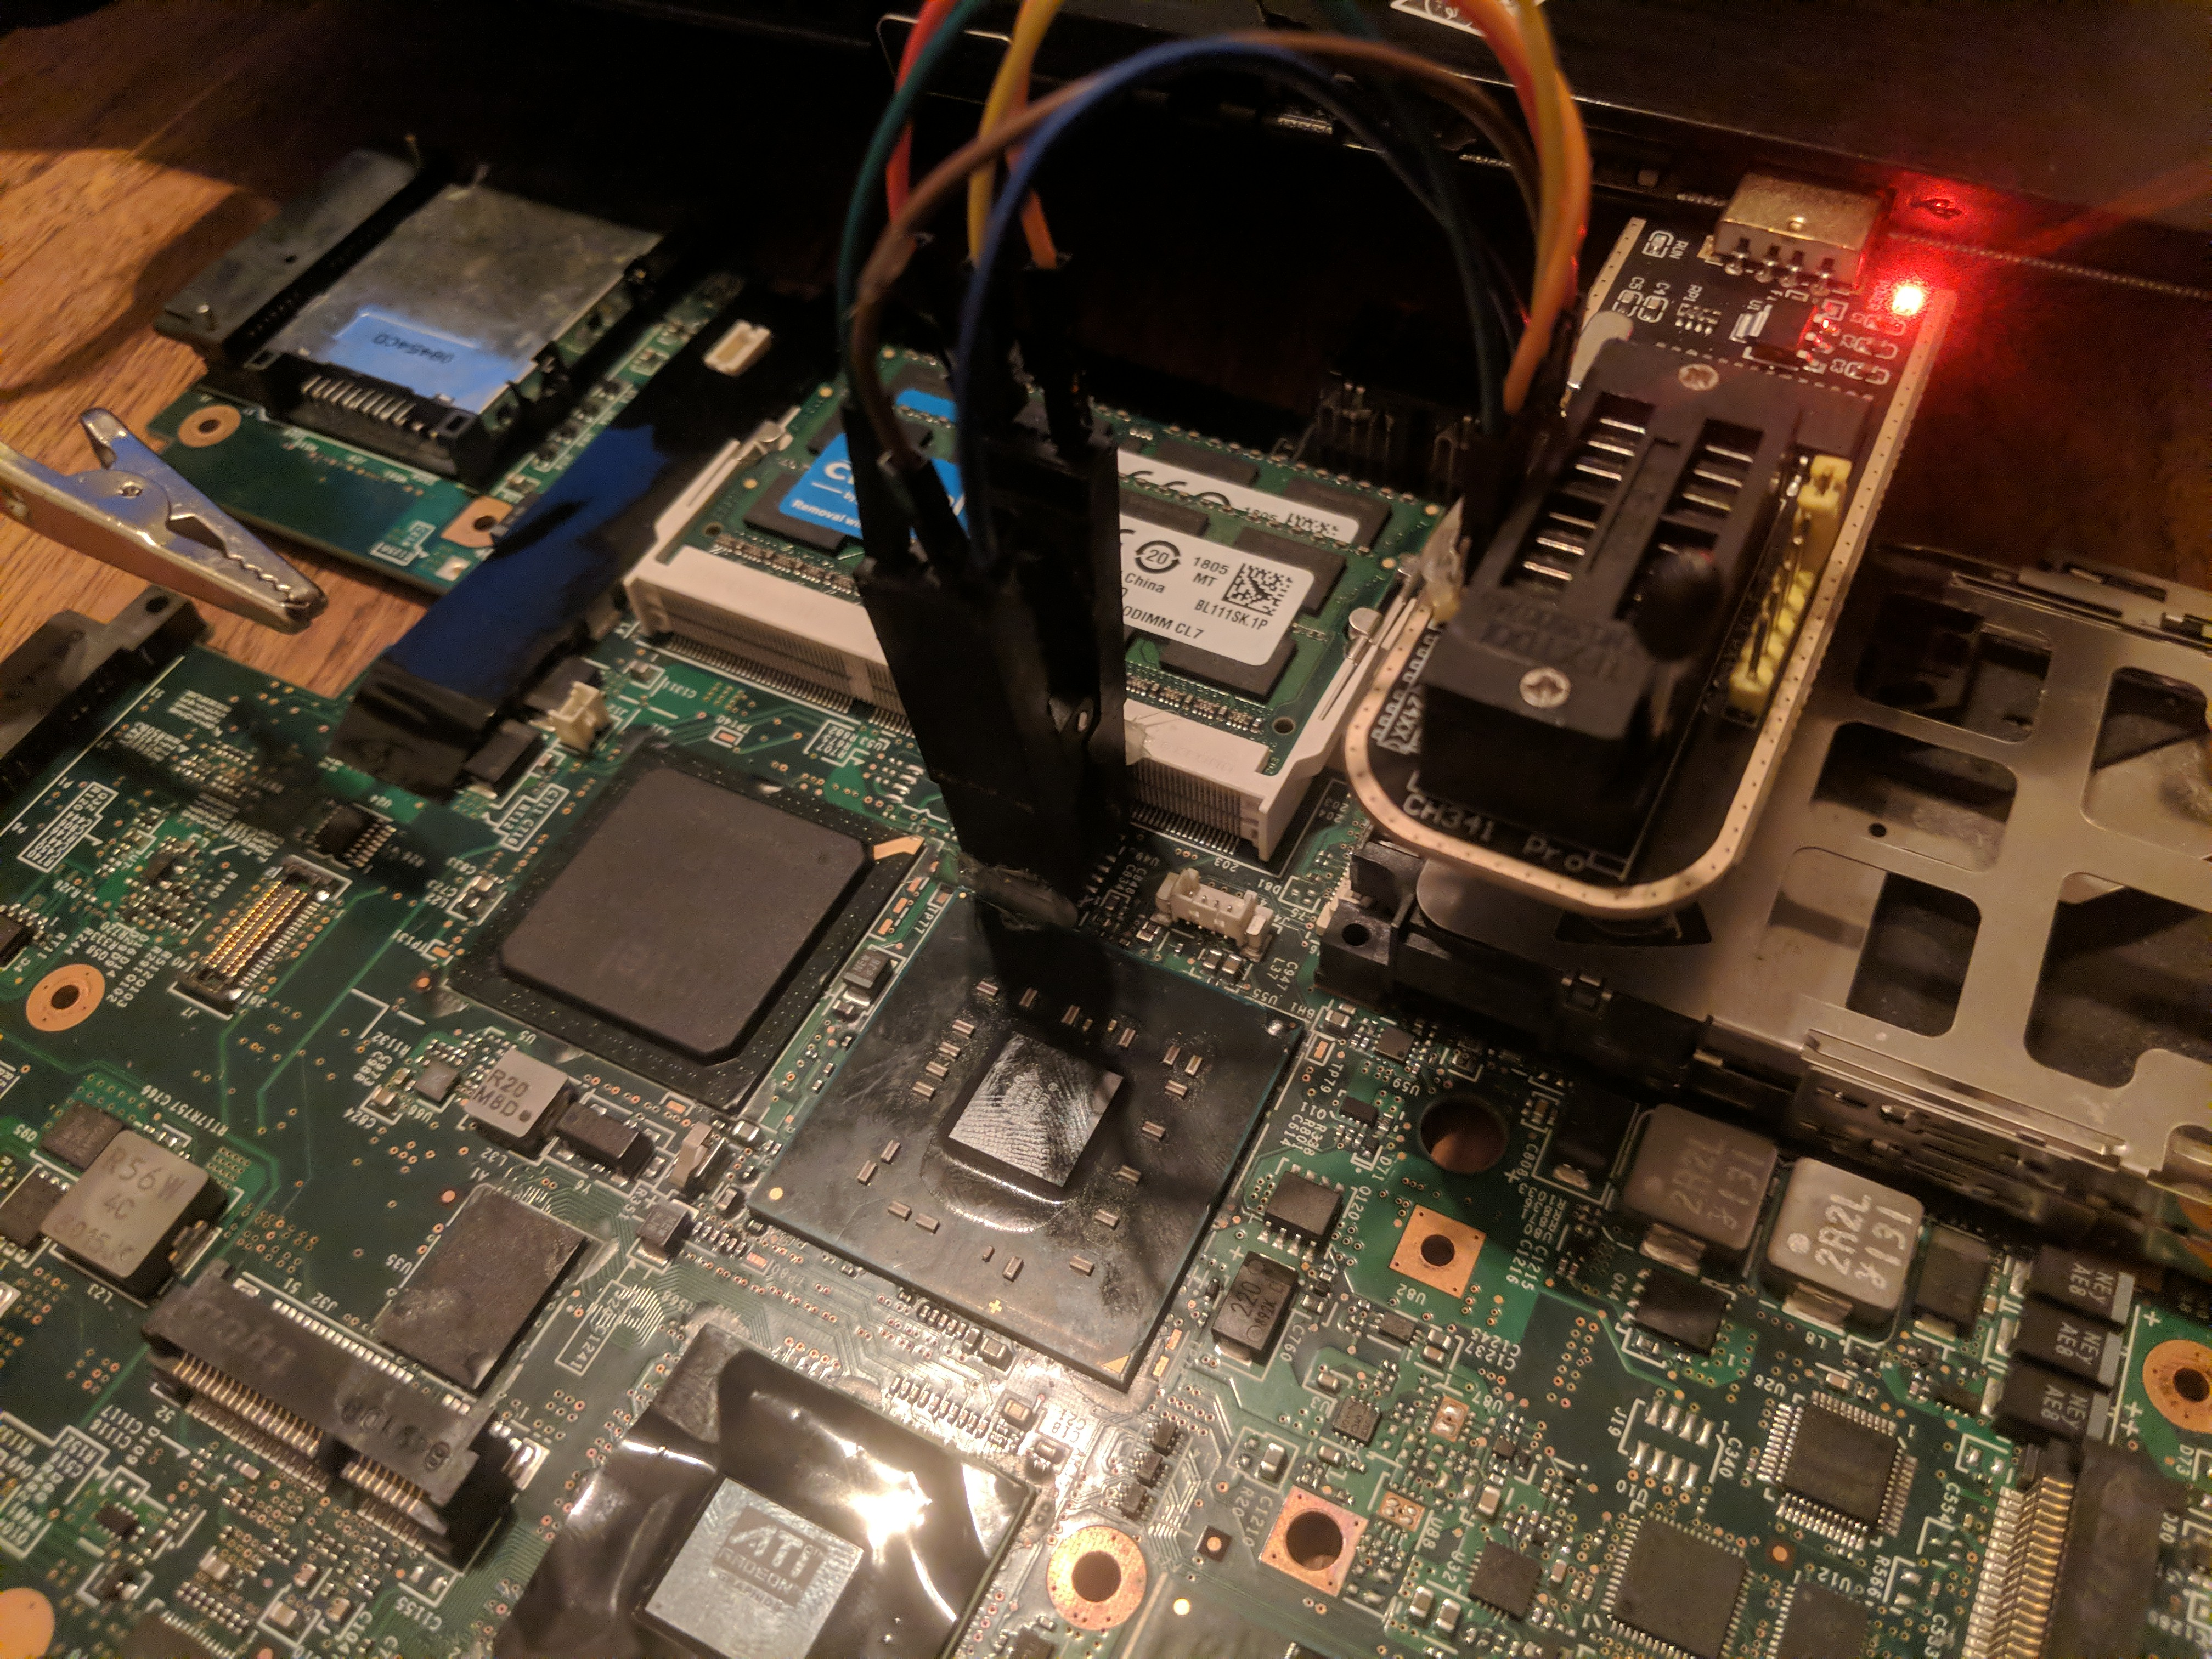
I had purchased the clip for an SOIC-16 machine but ended up Librebooting an SOP-8 machine that was in better condition. So it’s possible but not recommended to use a 16-pin clip for an 8-pin chip. The CH341A I bought was also a cheap Chinese copy. The name is wrong, and it says “MinProgramment” on the back. Initially, I thought that the programmer was the problem when I failed with the first machine, so I bought a Pi Pico instead. However, it turned out to be a bad clip, and the Chinese CH341A worked fine.
The cables on these clips are generally too long to get a good connection, so I recommend just connecting it with jumper wires. Here, the Pomona clip is also better than the Chinese clip because there is room for the jumper wires to attach to the clip. If you have a Chinese clip, you may need to bend the claws so the cables can fit.
If you get jumper wires, notice that only 6 pins need to be connected, regardless of whether it’s an 8-pin or 16-pin chip, so something like a 10-pack is fine.
Optional Upgrades
You can choose to upgrade certain parts in your computer if you want a more powerful machine. If you want to do this, get the following:
- New RAM (for a T500/W500, you’ll need 2x4GB PC3-8500 RAM).
- A SATA SSD.
- Optionally, a Quad-Core CPU. See which ones can be supported here and find benchmarks here. Note that only some models can support a Quad-Core CPU, and only with hardware modifications, as discussed in Part 1.
- Optionally, a new Wi-Fi card.
- Optionally, various ThinkPad accessories. Many ThinkPad models can have an extra battery or an additional hard drive in their Ultrabay (replacing the DVD drive). You can also get a dock, with an extra Ultrabay slot or a mini-dock (doesn’t have an extra Ultrabay slot).
- Optionally, a DisplayPort male or VGA male to HDMI female adapter: Old ThinkPads generally do not have HDMI but have VGA and/or DisplayPort instead. DisplayPort is closer to HDMI of the two. However, the DisplayPort only works if you have the version without dedicated graphics as the DisplayPort is controlled by the dedicated graphics card in this version (which Libreboot turns off)
I recommend purchasing a new Wi-Fi card that can run without proprietary firmware. You can find the names of Wi-Fi chipsets that can run without proprietary firmware here. Most Wi-Fi cards are half the size of what’s already in a T500/W500, which is fine – they stil fit.
If you are installing a Quad-Core CPU, you will also need a soldering iron and solder. I’m not skilled enough in soldering to give advice, but it’s probably a good idea to invest in a good soldering iron. I suspect that my 30W iron might not get hot enough – at least, it seems impossible to melt solder with it by heating the joints. The solder only melts if I touch it directly with the iron. Check the soldering section in this guide for some general tips.
General Buying Tips
If you can, buy locally. Old ThinkPads that can be Librebooted often go for cheap used. You probably won’t find CPUs, Wi-Fi cards, Pomona clips, and the correct type of RAM locally – at least not in a smaller country like mine, so you will probably have to rely on something like eBay for those. However, it’s generally better to buy individual parts from places like eBay rather than buying whole computers.
Part 3: The Libreboot Process
The Libreboot process consists of the following steps:
- Disassemble the computer until you can access the chip.
- Attach the clip to the chip and connect the cables between the clip and the programmer.
- Insert the programmer into the computer and read the contents of the chip with flashrom several times.
- Compare the chip’s content – if you read the same content multiple times, you have a good connection. If there is a difference in content, you have a poor connection.
- If the connection is good, you can write Libreboot to the chip with flashrom.
To disassemble the computer, I recommend using this guide. On the same website, you’ll find guides for other ThinkPad models. Use a different guide for the flashing part. His guide uses custom scripts and Libreboot builds that will make troubleshooting harder if you encounter issues.
Which Libreboot ROM Should I Use?
Start with something that should Just Work the first time – use a standard Libreboot release ROM without modifications the first time you flash. Once you’ve flashed with external equipment, the chip is no longer write-protected. This means you can flash it internally through software if you need to update/change your Libreboot version or flash something else to the chip. If you want to change BIOS settings, you need to modify the settings in the ROM using Libreboot’s nvramtool, which is part of Libreboot’s build system, lbmk. See how to use nvramtool to change BIOS settings here. Afterwards, you can flash the ROM (internally, through software) again.
Another thing you should consider changing at some point is your MAC address. It is changed in the flash, so all machines using standard Libreboot release ROMs have the same MAC address. This can lead to networking issues if you are ever connected to a network where another Librebooted computer with the same MAC address is also connected. See here for an explanation and here for how to change the MAC address.
Under Downloads on the Libreboot website, you can find release ROMs. I recommend using the latest release in the stable folder. Locate your model and the correct chip size, download, and unpack. The chip size can be found in the chip’s datasheet. Flashrom will also indicate the chip’s size when you read from it if you can’t find it in the datasheet.
In the unpacked folder, you’ll find many ROMs to choose from. You can choose between SeaBIOS and GRUB. Both are fine – GRUB is used as a bootloader by many Linux distributions. Some machines may not have both SeaBIOS and GRUB because they only support one of them. In that case, choose what is available. For T500/W500, all ROMs contain both SeaBIOS and GRUB – you can switch between the two at boot – the difference is whether Libreboot starts in GRUB or SeaBIOS. I prefer GRUB.
Additionally, you can choose between libgfxinit_corebootfb or libgfxinit_txtmode. Unless you have a reason to choose txtmode, such as installing BSD or adding a graphics card, go with corebootfb.
The next choice is the keyboard layout. There is no default Danish keyboard layout, so I chose Swedish. It doesn’t matter much since it only determines the keyboard layout used in the GRUB menu at startup – the keyboard layout in your operating system will be whatever you have set it to in the OS.
The last choice is with or without microcode. My limited understanding is as follows: CPUs contain proprietary microcode no matter what – at the moment it is not possible to get rid of it. The FSF makes a strange exception where they allow proprietary microcode if it’s inside the CPU but not outside the CPU. This means the FSF accepts old microcode that’s inside the CPU but not microcode updates, which are essentially small hotfixes that the CPU can load from outside the CPU (I think). Libreboot includes microcode updates by default for pragmatic reasons because you can’t escape CPU microcode anyway – so it’s better to have newer microcode than older microcode. Outdated microcode can lead to unstable computers and poses a security risk – a real risk, not just a you-havent-updated-your-android-phone-in-a-month-risk. The ROMs named nomicrocode do not contain microcode updates, but the CPU still runs proprietary microcode.
As far as I understand, proprietary microcode is not much of a privacy issue because it’s very limited in what it can do – it’s just instructions for the processor. In terms of software freedom, open microcode would be better, but it doesn’t really exist. So you can choose between outdated or updated microcode – I suggest you choose a ROM with microcode.
Some notes for the flashing process
For the flashing process, you can follow a video guide like this one. If you’re using a Pi Pico, follow the steps here first. Additional notes:
- Insert the programmer into the computer AFTER attaching the clip to the chip. If you do it the other way around, you can damage the chip or whatever. Theoretically, I did it several times without problems.
- Save the chip’s content as a backup when you have a good read. You can write it back to the chip in case something goes wrong.
- If flashrom says “Error: Programmer initialization failed,” it means it can’t find your programmer.
- If flashrom says “No EEPROM/flash device found,” it means it can’t find the chip – probably due to a bad connection.
- Sometimes you need to specify the chip’s name with -c CHIPNAME. Flashrom provides some possible chip names when you try without specifying the chip name. The name is also printed on the chip itself.
- When specifying the name, write it exactly as flashrom writes it. If there are multiple chip names on the same line, write both – in my case, the chip name was “MX25L3205D/MX25L3208D,” the first of these two was the name of my chip.
- Flashrom also tells you the size of the chip. Make sure you flash a Libreboot ROM of the same size to the chip – i.e., a 4 MB ROM to a 4 MB chip.
- Even if you have a good connection and the chip reads well and consistently, it’s not uncommon for flashrom to fail when writing to the chip. If that happens, it can still work if you try to write again.
- Some Macronix-chips can't be flashed with regular flashrom. I therefore recommend using whackrom, which is a fork of flashrom with a workaround for these chips. Run with the --workaround-mx flag.
- If flashrom ends with “Verifying flash… VERIFIED,” Libreboot has been successfully flashed to the chip.
Once you’ve flashed it, you can plug in the display, keyboard, and power to the machine again (power last, for safety) and try to start the machine to check if it works before reassembling it.
Extra: Quad Core Mod
This section is only relevant if you want to install a Quad Core CPU in a T500/W500 or a similar model. When you upgrade to a more powerful processor that draws more power, your computer will run hotter. Therefore, some people modify their T500/W500 to have a larger air intake by drilling a hole in the bottom near the cooler and covering the hole with a mesh. In my opinion, this is a bit overkill. Here are some benchmarks that show the difference between regular and larger air intakes might not be significant.
For me, the machine reaches slightly above 70 degrees when playing games that also stress the graphics card. The critical temperature is 100 degrees. With powersave as the CPU governor, it doesn’t get very hot.
In the past, you had to compile Libreboot with support for 4 cores, but since version 20210522, Libreboot supports 4 cores by default in models that can run Quad Core CPUs. So use standard Libreboot release ROMs to make troubleshooting easier.
The Quad Core mod consists of two things:
- Carefully break off some (5) pins from the CPU.
- Solder a cable between two points on the motherboard.
The first part is easy if you take it slow and steady, the second part is a bit trickier.
Follow this guide to see how you can modify the CPU and motherboard to support a Quad Core CPU. Also, see this video and this video.
Also, check out this thread for more pictures. Not all motherboards look exactly the same, so try to find a picture that looks like yours.
Here’s how I managed to solder on the cable:
- I just used one of the spare jumper cables with the connector cut off.
- I put insulating tape on the surrounding points to avoid accidental connections.
- Keep the tip of your iron clean! If the tip is dirty (i.e. it has melted plastic on it), it transfers heat very badly and you will have issues with melting the tin without overheating parts. The tip can be cleaned with steel wool or sand paper (sand paper quickly wears a tip down but it was what I had on hand).
- I’m not sure if the CPU can push the solder out of the point, but I only succeeded in soldering the cable properly when I tried it with the CPU already in place. I’m not sure if this is a bad idea.
- There’s usually a square-shaped metal part where you need to solder the cable, which holds the screws for the cooler. I couldn’t find any information about what people do with it, but you can probably cut one side off it to make it horseshoe-shaped instead of it going over the cable, or you can just not put it on again which seems to work fine but might cause issues with the temperature if the cooler loses contact with the CPU/GPU.
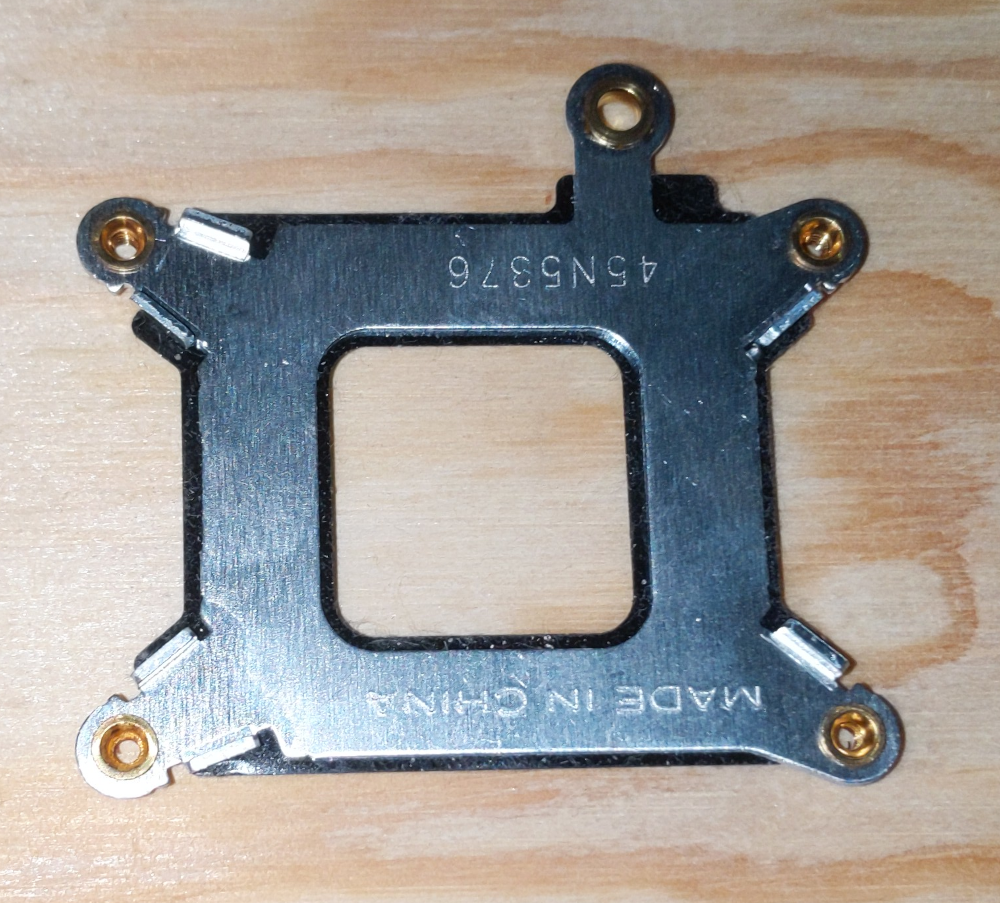
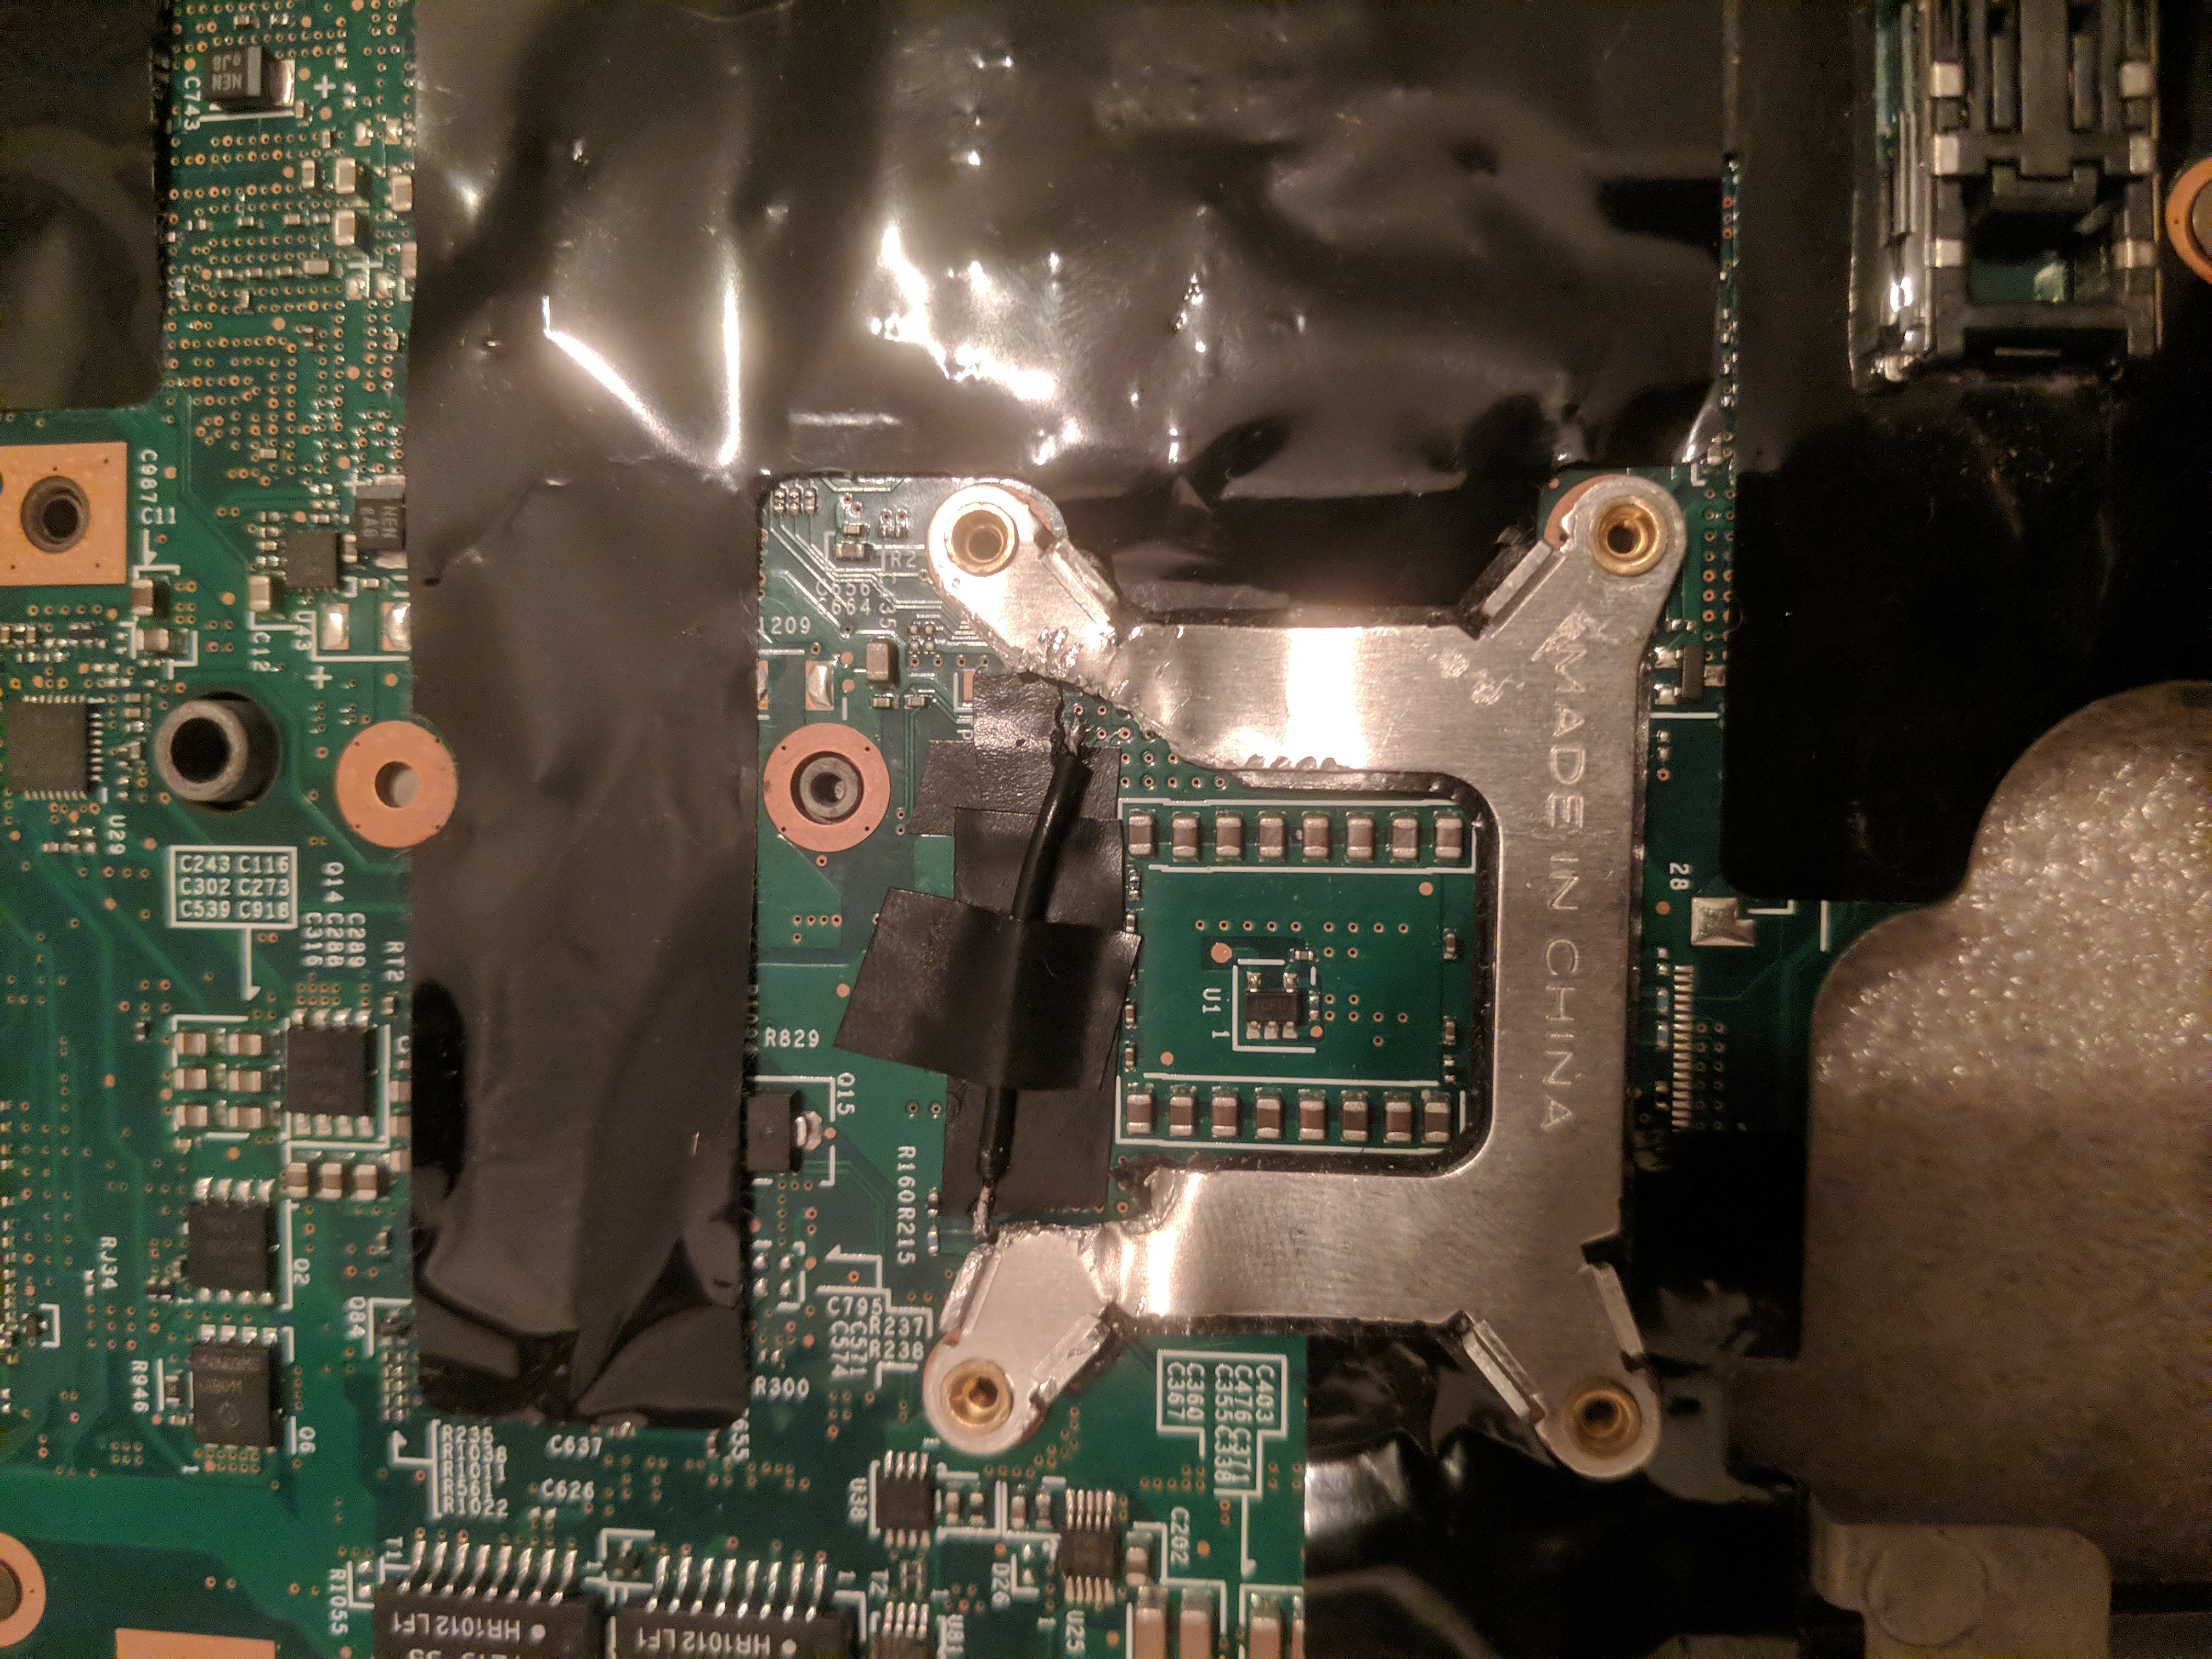
Once you’re done, you can check again by plugging in the display, keyboard, and power to the machine before reassembling it. If it doesn’t work, you may need to remove the cable, clean the board, and try again.
NOTE: The computer can sometimes start even if the cable is not soldered properly. It can even pass the memtest built into Libreboot. In my first attempt, I thought it was working because it could start, everything was functioning in the Libreboot menu, and it passed memtest. However, when I tried to boot an operating system, the keyboard stopped working, and I couldn’t input my root password. I tried with different Linux and BSD live USBs; most wouldn’t boot, and in those that did, the keyboard didn’t work. When starting the machine for the first time, it didn’t work – it acted like an old car, taking a few tries to get it to start.
In addition, I got a lot of ACPI errors. I could only boot from a USB if I added “acpi=off” as a boot parameter in GRUB. I ended up SSHing into the computer using this guide, from here it was clear that Linux wasn’t detecting more than than a single core in the CPU and couldn’t find the keyboard or touchpad either.
The computer should start on the first try and should be able to boot an operating system if you’ve done everything correctly.
Additional
Another advantage of Libreboot is that you can encrypt your boot partition. Previously, you could only encrypt the boot partition with PBKDF2 key derivation (an older algorithm vulnerable to GPU-based attacks). However, Libreboot has just implemented some GRUB patches in the 20231021 release that allow you to encrypt the boot partition with argon2 key derivation (a newer algorithm with fewer vulnerabilities).